Add SiteLint to your site
To integrate your site with SiteLint Audits, you need to be able to update the HTML code of the website you want to audit.
Where is the JavaScript code snippet for my site?
To set up the SiteLint code snippet, follow these steps:
- Log In to the Platform. Don’t have an account? Sign Up to create an account. Note: The initial short code snippet appears on the Sign Up welcome flow.
- Go to Sites, then select More actions, View site settings.
- Follow the link Installation API Token. This should lead you to the section where you’ll be able to create the code snippet for your site.
Installation code snippet
Choose the method that works best for your site setup:
Option 1: Direct HTML Integration
Insert the code snippet between the <head> and </head> HTML tags of your site. You can generate a ready-to-use code snippet by going to Sites, More actions, View site settings and following the link Installation API Token. The Installation API Token
section will help you generate the SiteLint code snippet.
Option 2: WordPress Plugin
Got a WordPress site? Our dedicated SiteLint WordPress plugin makes integrating SiteLint super easy.
Just install it directly from your WordPress admin panel – no coding required! It handles the snippet placement for you, and you can manage your SiteLint settings right alongside your other WordPress plugins.
It’s perfect for quickly getting started and keeping everything tidy within your familiar dashboard.
Option 3: Google Tag Manager
Follow these steps to add SiteLint via Google Tag Manager:
- Log in to your Google Tag Manager account.
- Select the container for the website you want to audit.
- Go to Tags in the left sidebar and click New.
- Click on Tag Configuration and select Custom HTML as the tag type.
- Paste the SiteLint code snippet (generated from your Installation API Token section) into the HTML field.
- Under Triggering, select the appropriate trigger. To comply with privacy regulations (GDPR), see the Consent Management section below. If privacy consent is not required, you can select All Pages.
- Click Save and then Submit to publish your container.
GDPR Compliance & Cookie Consent
To ensure SiteLint only runs after a user has granted consent via your Cookie Banner (CMP), follow these steps to adjust your Google Tag Manager trigger:
- Using Consent Mode: In the Tag Configuration, go to Advanced Settings, Consent Settings. Select Require additional consent for tag to fire and add
analytics_storageorfunctionality_storage, depending on your site’s classification. - Using Custom Events: Instead of the All Pages trigger, create a Custom Event trigger. Set the event name to match the one fired by your Cookie Banner when a user accepts cookies (e.g.,
cookie_consent_analytics).
Note: Since SiteLint loads external scripts, firing it only after consent ensures that no IP addresses are processed or local storage data saved without user permission.
For more details on managing user consent, refer to Google’s official guide on Consent Configuration.
How do I verify if the audits work?
Once the code snippet is placed on your site you should start receiving audit results, and they should be available under Sites section. The reports will be visible typically within 24-48 hours.
See also How to check if SiteLint is working for troubleshooting potential issues.
Configuration options for the code snippet
The SiteLint code snippet with audits is also configurable under Sites, More actions, View site settings and following the link Installation API Token.
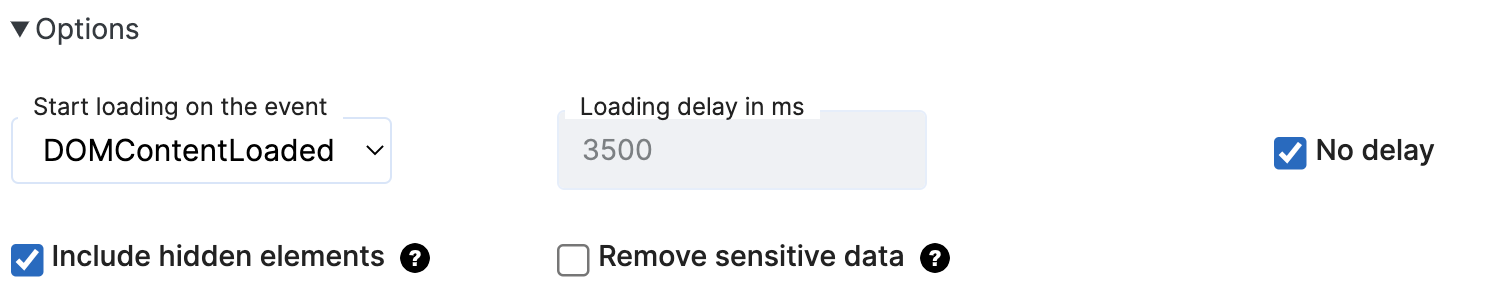
Here are the available options and what they do:
- Start loading on the event: This determines when SiteLint begins its audit.
DOMContentLoaded(Default): SiteLint starts as soon as the HTML document is fully loaded and parsed, without waiting for stylesheets, images, and subframes to finish loading. This is usually the fastest option to get an audit running quickly.onLoad: SiteLint waits until the entire page, including all dependent resources (like images and stylesheets), has fully loaded. Choose this if you need SiteLint to audit elements that might only appear after all resources are available.
- Loading delay in ms: Need to give your other scripts a head start? You can introduce a delay before SiteLint starts loading.
- No delay (Default): SiteLint loads immediately based on your chosen “Start loading on the event” setting. This is generally recommended for optimal audit timing.
- Set a specific delay: If you have specific scripts that need to execute first, or if you notice conflicts, you can set a delay in milliseconds. (e.g.,
500for half a second).
- Include hidden elements: This option controls whether elements that are not visible on the page (e.g., via
display: noneorvisibility: hidden) are included in the audit.- Checked (Default): Hidden elements are included in the audit. This is useful for comprehensive checks, especially if elements are dynamically revealed or have accessibility issues even when hidden.
- Unchecked: Hidden elements will be excluded from audits. This can be useful if you only want to focus on what users visually interact with, or to speed up audits on very complex pages.
- Remove sensitive data: This privacy-focused option allows you to anonymize data within your audit reports.
- Unchecked (Default): All text and form control values are included in your audit reports as they appear on your site.
- Checked: If you’re concerned about sensitive information appearing in your audit reports, check this option. It will remove all texts (including titles) as well as values from form controls, ensuring your reports are anonymized.
- Watch dynamic changes: This powerful option allows SiteLint to continuously monitor your page for changes and perform live audits as content updates.
- Checked: This enables
Follow The Behavior
(FTB). SiteLint will watch for dynamic changes (like page content changes or single-page application dynamic changes) and audit those changes in real-time. This is great for modern, interactive websites. - Unchecked (Default): SiteLint performs an audit based on the initial page load or the chosen loading event, without continuously monitoring for subsequent dynamic modifications.
- Checked: This enables
Technical details
The SiteLint code snippet is lazy-loaded and does not impact the initial page loading performance. It uses the defer attribute, but you can change that to async when you need.
How does the async and defer attribute works?
This is all summarized in the schematic diagram below:

Source: WHATWG
The preconnect link
We recommend also adding the following code to speed up loading even further:
<link rel="preconnect" href="https://auditor.sitelint.com/" crossorigin>