To integrate your site with SiteLint Audits, you need to be able to update the HTML code of the website you want to audit.
To install the script you can:
- Insert the code snippet between the
<head>and</head>HTML tags of your site. - Use our SiteLint WordPress plugin.
- Use Google Tag Manager.
We recommend also adding the following code to speed up loading even further:
<link rel="preconnect" href="https://auditor.sitelint.com/" crossorigin>Where to find your JavaScript snippet?
- Log In to the Platform. Don’t have an account? Sign Up to create an account. The SiteLint code snippet will also be available on the Sign Up Welcome page.
- Go to Settings, then select Api Token.
- Use action Installation to generate the code snippet.
- Copy the entire content of the text box to the clipboard (or use the Copy script to clipboard button for that purpose).
- Insert the code snippet between the
<head>and</head>HTML tags of your site.
How do I verify if the audits work?
Once the code snippet is placed on your site you should start receiving audit results and they should be available under Audits, then Sites. The reports will be visible typically within 24-48 hours.
See also How to check if SiteLint is working for troubleshooting potential issues.
Configuration options for the code snippet
The SiteLint code snippet with audits is also configurable under Settings, then select Api Token and use action Installation.
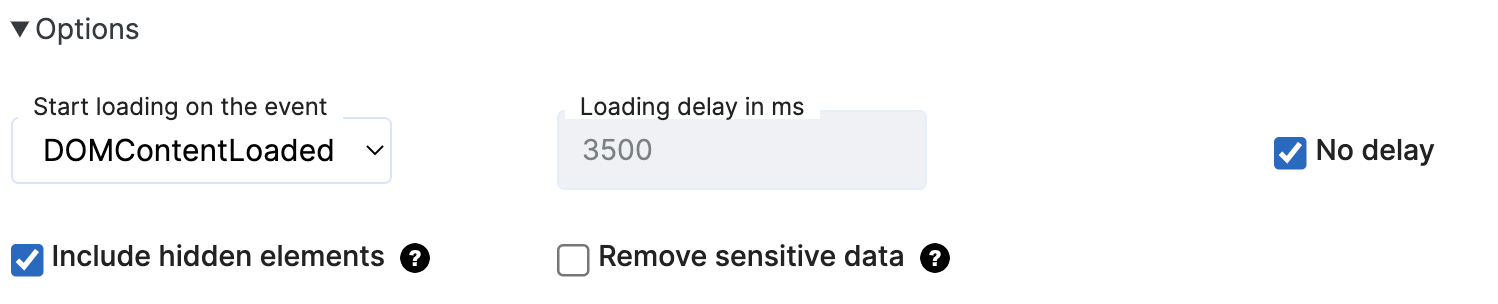
There are the following options:
- Start loading on the event – you can choose on which event the code should start loading:
onloadorDOMContentLoaded. Default:DOMContentLoaded - Loading delay in ms – for any reason, you may want to delay the loading code with a specific delay time. Default: no delay.
- Include hidden elements – this option allows you to include or exclude invisible elements while auditing the site. Default:
true. - Remove sensitive data – this option allows you to remove all texts as well as all form controls value. Default:
false.
Technical details
The SiteLint code snippet is lazy-loaded and does not impact the initial page loading performance. It uses defer attribute, but you can change that to async when you need.
How does the async and defer attribute works?
This is all summarized in the schematic diagram below:

Source: WHATWG